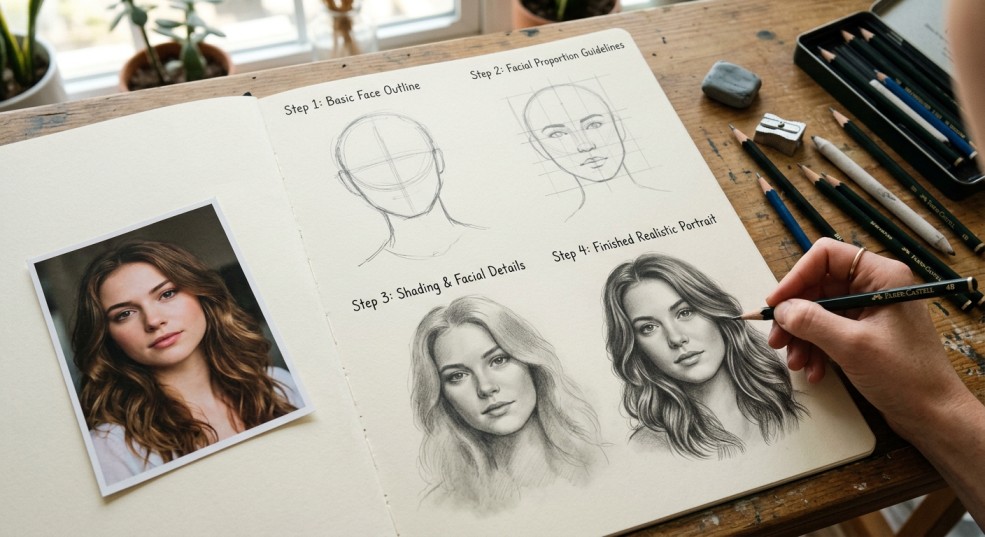
Portrait drawing is one of the most rewarding skills an artist can learn. Many beginners start practicing by drawing faces from photographs because photos provide a stable reference for studying shapes, proportions, and details.
However, beginners often struggle with portrait drawing because they focus on small details before understanding the basic structure of the face. Professional artists follow a step-by-step method that makes portrait drawing easier and more accurate.
At Ankona School of Art, students learn portrait drawing through structured lessons designed to build strong fundamentals. If you are looking for the best online class for learning drawing and portrait sketching, mastering portrait drawing from a photo is an excellent starting point.
Step 1: Choose a Clear Reference Photo
Start by selecting a good quality photograph. A clear photo with proper lighting helps beginners see important details such as facial structure, shadows, and highlights.
When choosing a reference image, look for:
-good lighting on the face
-clear facial features
-minimal background distractions
-A good reference photo makes portrait drawing much easier.
Step 2: Draw Basic Guidelines
Professional artists always begin with simple guidelines.
Start by drawing a circle for the head shape, then add a vertical line through the center and a horizontal line across the middle. These guidelines help place facial features correctly.
Using light lines at this stage allows easy corrections.
Step 3: Map Facial Proportions
Accurate proportions are essential in portrait drawing.
Follow these basic rules:
-The eyes are placed on the middle horizontal line
-The bottom of the nose sits halfway between the eyes and chin
-The mouth is located between the nose and chin
-These proportional guidelines help maintain balance in the drawing.
Step 4: Sketch Facial Features
Once the basic structure is ready, begin sketching the main features such as the eyes, nose, and lips.
Focus on:
-overall shapes rather than small details
-correct spacing between features
-light sketch lines for flexibility
At Ankona School of Art, students learn to simplify facial features into basic shapes before refining details.
Step 5: Add Shading and Depth
Shading brings the portrait to life. Carefully observe the light source in the reference photo and identify where shadows appear.
Common shading areas include:
-under the eyes
-around the nose
-under the lower lip
-along the jawline
Use soft pencil strokes to create gradual shading and depth.
Step 6: Refine Details and Texture
Finally, add details such as hair texture, skin shading, and small highlights. Avoid overworking the drawing — subtle shading often creates more realistic results.This stage completes the portrait and gives it personality.
Learn Portrait Drawing with Ankona School of Art
At Ankona School of Art, students learn professional portrait drawing techniques through structured training programs. Our classes focus on:
-step-by-step drawing methods
-portrait and anatomy fundamentals
-shading and realism techniques
-personalized guidance from experienced instructors
If you are searching for the best online class for learning drawing and portrait sketching, Ankona School of Art provides the right guidance for beginners and aspiring artists.
Final Thoughts
Drawing a portrait from a photo is an excellent way to practice observation, proportions, and shading. With the right techniques and consistent practice, beginners can quickly improve their portrait drawing skills.
Start your artistic journey today and develop professional drawing skills with Ankona School of Art – one of the best online classes for learning drawing and creative art skills.